Getting started in Spring Boot, Part 2 Creating Views with Thymeleaf
In the first part of our Spring Boot series, we set up a Team project and elicited a first edition from the service. This article is about views, that is, websites that Spring likes to create with Thymeleaf.
Companies on the topic
 In Spring, views, i.e. websites, are often created with Thymeleaf.
(Image: Thymeleaf.org)
Thymeleaf is a server-side template engine and thus resembles the well-known Java Server Pages. Unlike these, however, Thymeleaf templates can be displayed in the browser without problems and edited with common design tools.
Thymeleaf can be integrated by adding the starter to the POM file of the Maven project spring-boot-starter-thymeleaf as a dependency causes. This can be done in the Spring Tool Suite (STS) via the context menu (Spring > Edit Starters) or directly in the XML code:
<dependency>

<groupId>org.springframework.boot</groupId>

<artifactId>spring-boot-starter-thymeleaf</artifactId>

</dependency>
One of the most important features of Spring Boot is the auto configuration. Depending on integrated libraries, certain beans are configured automatically. The integration of spring-boot-starter-thymeleaf causes the configuration of a View resolver for Thymeleaf. This component maps view names to Thymeleaf templates, which are searched under src/main/ressources/templates.
Template
Such a template called ” home.html“ we now create there with the following content:
<!DOCTYPE HTML>

<html xmlns:th="http://www.thymeleaf.org">

<head>

<title>Home</title>

<meta http-equiv="Content-Type" content="text/html; charset=UTF-8" />

</head>

<body>   <p th:text="'Ich bin eine Thymeleaf-View!'" />

</body>

</html>
A reference to Thymeleaf is only given by the attribute “th: text” with the corresponding namespace declaration. As expected, it serves the output of text. You can load the HTML file from the file system with a browser, but then you won’t see the output. The browser ignores the unknown attribute “th: text”. Thymeleaf is a server-side Rendering technology. Unlike client-side rendering frameworks such as Angular or Vue.js must be evaluated and replaced by the server before being delivered to the browser.
For this, the template must first be found by the service, the name must be communicated. This occurs in the return value of a controller method. Since the return value now serves as the key to find the template (and is no longer to be written directly into the HTTP response as in part 1), the @ResponseBody annotation is no longer required. The ending”.html“ is assumed as default and can be omitted:
@Controllerpublic class PersonController { @GetMapping("https://www.dev-insider.de/")
public String home() {
      return "home";

}

}
The call of http://localhost:8080 the browser now displays the website with the text as desired.
Data transfer via Model
To make the view a little more interesting, it should now receive data from the controller. Here the passed object is a Person:
package com.example.demo;public class Person { private String firstname;
private String lastname;
public String getFirstname() {
return firstname;
}
public void setFirstname(String firstname) {
this.firstname = firstname;
}
public String getLastname() {
return lastname;
}
public void setLastname(String lastname) {
this.lastname = lastname;
}
}
An implicit model object is added to the parameter list of the method. This model is managed by Spring Boot, it is automatically passed to the View. Any data objects can be added to the model. Later, the data like last name and first name are loaded from a database, but here they are hard coded.
@Controllerpublic class PersonController { @GetMapping("https://www.dev-insider.de/")
public String home(Model model) { Person person = new Person();
person.setFirstname("Max");
person.setLastname("Mustermann");
model.addAttribute(person); return "home";
}
}
In the Thymeleaf template, the person object in the model can be accessed using the dollar sign and curly brackets.
   <span th:text="${person.firstname}" />

<span th:text="${person.lastname}" />
This also works with lists. If a list object with several persons is stored in the model, you can iterate over it with “th:each” :
<tbody>

<tr th:each="person: ${personList}">

<td th:text="${person.firstname}" />

<td th:text="${person.lastname}" />

</tr>

</tbody>
The addAttribute () method of the model can optionally be used as a second parameter to specify the name of the object under which it is to be addressed in the template. If you omit it, the lower case name of the class is used for lists with an attached “list” (in this case person or PersonList).
Form
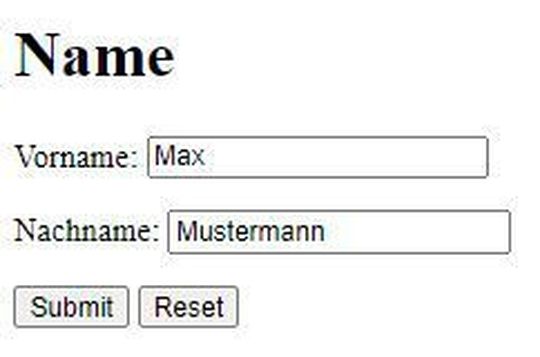
So far, data has been transferred from the service to the website. Of course, this also works in the other direction, for example, data entered in a form should be transferred to the service. The following code piece gives an example:
<h1>Name</h1>

<form action="https://www.dev-insider.de/views-mit-thymeleaf-erstellen-a-976811/#" th:action="@{/}" th:object="${person}" method="post">

<p>Vorname: <input type="text" th:field="*{firstname}" /></p>

<p>Nachname: <input type="text" th:field="*{lastname}" /></p>

<p><input type="submit" value="Submit" /> <input type="reset" value="Reset" /></p>

</form>
 Form with Thymeleaf attributes.
(Photo: Dr. Koller)
The Thymeleaf attribute” th: action ” indicates which URL should be called. With” th:object “the object is specified in the model, whose variables are then accessed with” th:field”.
Since this is a post request, the annotation @PostMapping is now used on the server side in another method. So post requests on / are processed in this method. The list of method arguments is extended by the passed person. The annotation @ModelAttribute before causes the argument to be retrieved from the model.
@PostMapping("https://www.dev-insider.de/")public String home(@ModelAttribute Person person, Model model) { model.addAttribute(person);
return "home";
}
At this point it is important to remember the procedure of the requests again. If you call localhost:8080 in the browser, this is a GET request that is processed by the controller method with the GetMapping. In it, the person Max Mustermann is created and packed into the model.
Then the View Resolver determines the appropriate view with the form and fills it with the model. If you click on the Submit button in the form, a post request is executed that passes the entered name of the controller method annotated with PostMapping. First name and last name are then available in the Person object.
Of course Thymeleaf offers much more, we just scratched the surface here. For example, “th:if” is often required to show or hide HTML elements under certain conditions. Further information on this and many other attributes can be found in the Thymeleaf project documentation.
In the next part of the series we deal with databases and Spring Boot. See you then!
(ID:46970305)


