Native Client for Terminal tasks, Working with GitHub CLI
The balancing act between Git on the command line and the GitHub web interface is over: GitHub has given itself a native client for the terminal-and the handling is pleasantly simple.
Companies on the topic
 The native GitHub CLI offers the possibility to perform important actions via command line without having to bother the web interface.
(Image: Lang / GitHub)
Those who work with GitHub have many opportunities to build a personal outstaffing workflow. Many developer tools offer a corresponding connection for issues, pull requests and the like. The actual work on the code usually takes place very simply with Git directly in the terminal.
Instead of complex development workers such as the constantly growing Jira portfolio, only GitHub’s web interface is often used for the management around it. After all, it is simple, offers – of course – all GitHub functions and if you are honest: it is simply there.
As convenient and intuitive as the work in the browser may be, the constant change between terminal and web, keyboard and mouse is annoying. Just think of notebooks that are only meant for development – does a graphical desktop environment really have to run there just to confirm a few GitHub issues?
Well, that didn’t have to be the case in the past: with the hub listed in the GitHub repository, there has been a CLI access for GitHub and Git for quite some time. Hub acts as a git wrapper and also provides direct interaction with GitHub. You could probably call it a GitHub-specific Git version. Although Hub is not an official GitHub project, it is privately managed by a GitHub employee.
Hub brings Git and GitHub workflows together, while the official GitHub project GitHub CLI (short: gh) relies solely on the latter. So you can basically choose whether you use Git and GitHub together via hub or separately with Git and GitHub CLI.
At GitHub, there were certainly considerations to make Hub an official project. However, they decided against it and in favour of gh in order not to offend Hub users and to create easier CLI access for GitHub workflows.
Functional scope
GitHub CLI provides access to the complete workflow via a clear set of commands (such as “gist”), sub-commands (such as “create”) and flags (such as “–public”). Here are the commands with a selection of the Subcommands:
- alias (delete, list, set)
- pr (checkout, merge, review)
- release (download, upload)
Using the api command, you can send direct HTTP requests to the GitHub API, which are then output locally.
Setting up GitHub CLI
For the installation of GitHub CLI all relevant operating systems are supported, partly via package manager, alternatively via binary downloads or of course the source itself. Among them are also downright exotic platforms such as Android and NixOS. For Debian and Ubuntu, the process is pretty straight forward:
sudo apt-key adv --keyserver keyserver.ubuntu.com --recv-key C99B11DEB97541F0sudo apt-add-repository https://cli.github.com/packagessudo apt updatesudo apt install gh
For Windows an MSI file of the GitHub CLI is available, more elegant it goes over the free package manager Chocolatey – whose packaging we present by the way soon here:
choco install gh
Even if the gh commands are quite clear, you might want to set up autocompletion as a first step, if this has not been done via the package manager. For this it is necessary to use the following command ideally in the personal bash configuration (~ / .bashrc) or simply run it for testing:
eval "$(gh completion -s bash)"
Then you establish a connection to the desired GitHub account, for example to GitHub.com.Basically, a simple “gh auth login” is sufficient to start the interactive login.
However, since this does not work in the Git Bash for Windows, for example, you can also go directly via a corresponding token. To do this, first create in your GitHub account settings (not repo settings!) under ” Developer settings / Personal access tokens “a token with at least the two activated areas” repo “and” read:org ” and save the string in a file (here for example mytoken.txt).
Now you can also authenticate in the Windows bash as follows:
gh auth login --with-token < meintoken.txt
Once the connection is established, you can, for example, clone an existing repository for testing and display the readme that can also be seen in the web interface-here using the example of the “cli-help” repo“:
gh repo clone cli-helpcd cli-helpgh repo view
This means that gh is ready for work – but there is also an option for configuring via “gh config”, which can set/display the following four settings via the subcommandos “get” and “set” :
- git_protocol: HTTPS (default) or SSH
- editor: text editor, set
- prompt enable/disable: Turn interactive input on / off
- pager: Set terminal pager (for example more or less)
In general, you get help for the individual commands in gh via “gh COMMAND –help”.
Working with gh
The actual work with gh is basically quite simple, if you understand Git and GitHub. To play through the whole time with the example of a pull request, first the necessary preparations, i.e. a new branch, a change and a commit:
git branch testing1git checkout testing1git push --set-upstream origin testing1vi readme.md → Änderungengit commit -am "gh testing"
Now you can change your Readme.md send as pull request for the branch master in branch testing1. Again, the following applies: the interactive variant does not work in the Windows bash, so here is a standalone command:
gh pr create –title “gh testing pr” –body “just testing …”–head testing1
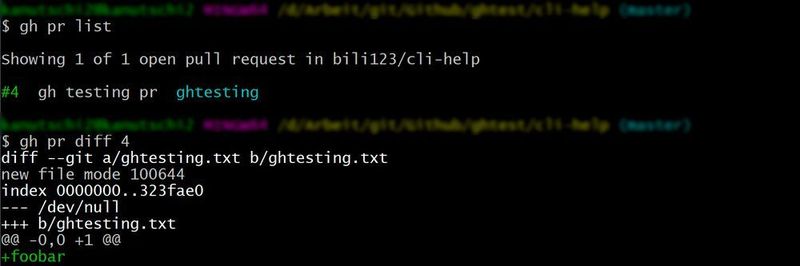
Here the title, message body and especially the branch are simply specified with the commit for the pull request. In the master branch, you can then work with the pull request and, for example, go through the following simplified workflow:
gh pr list (nummerierte Liste von PRs)gh pr view 4gh pr diff 4gh merge -m 4
With the last command, the actual merge is performed by means of the “-m”flag with the method “merge commit” (instead of rebase or sqash). The branch testing1 is automatically set up locally and GitHub.com deleted.
All other commands follow this pattern again and again. For the exact syntax, it is really only important to remember that there is support for both commands and sub –commands, i.e. “gh COMMAND –help” or “gh COMMAND SUB-COMMAND-help”.
However, some things will come up again and again, so it is worthwhile to create gh-internal aliases. For example, if you regularly receive pull requests from various employees, you could easily display their PRs via “gh prlist peter”, “gh prlist jochen” etc., if you set a corresponding alias:
gh alias set prlist 'gh pr list --assignee "$1"'
Of course, gh also works with GitHub Enterprise Server, so that it can replace the web interface everywhere immediately. And it probably will in many places, because the still quite young project simply goes by the hand and the possibility to simply transfer GitHub workflows into scripting is already tempting.
It is certainly worth taking a look at the GitHub-CLI-homepage from time to time. Finally, as an open source tool for developers and for developing, it is predestined for extensions, modifications and new gimmicks.
(ID:46964453)